I purchased a 3d resin printer in 2019 (Elegoo Mars Pro 2) and since then, have been using it to print small miniatures (for myself) and toys and random things for the kids. I set it up in my basement in the “Sump Pump Room” which is, surprise, a small room with two pits and three pumps to pump ground water out of the house. It’s big enough for a standing desk and a wire rack shelf (which is where the printer sits). There is one high window well, which barely opens and provides some ventilation.
Now, I have yet to read anything to suggest specific dangers related to handling resin, other than concerns with third degree burns from the stuff when it’s hot off the press. I purchased “plant-based” resin, which, perhaps is safer, but, again, no proof to be seen. Out of caution, most folks I read about online made sure they were printing in a well-ventilated space, and oftentimes with a respirator. So, I popped on my respirator, put on my nitrile gloves, and cracked a window. But the smell lingered and with it a fear that I was not doing enough. Thus, it became time to work on a home-grown ventilation system.
Lucky for me, my neighbor, Andy, used to own his own car repair shop, and is both a great mechanic and an artist in his own right (metalworking, woodworking, assemblage, you name it). He came up with the plan and we bought materials and got down to work.
Supplies
Of course, there are so many ways to go about this. I will drop the supplies we used below and link to Amazon where I can, but most of this stuff you can pick up at Loews, Home Depot, or any other home improvement shop. Here’s what we used to get the job done:
- 6″ Inline Duct Fan
- 4″ Dust Hood Collector
- Duct Fan Speed Adjustor (optional)
- 6-4″ Reducers (x2)
- Some 2 in. x 4 in. lumber (depending on your ceiling you may be able to mount directly without this)
- 4″ Heavy Duty Semi-Rigid Duct (we used two 8 foot packages)
- Wide Mouth Vent Hood (just like for your drier, vent opens when air pushes through)
- Adjustable steel clamps
- Wire cutter
- Crimping Tool
- Hand saw
- Drill with 4″ Hole Cutter drill bit
- A keyhole saw (really anything to cut through shingles to size for the vent hood)
- Circular saw (for cutting the wood)
- Silicone sealant
- Assorted screws
The Plan
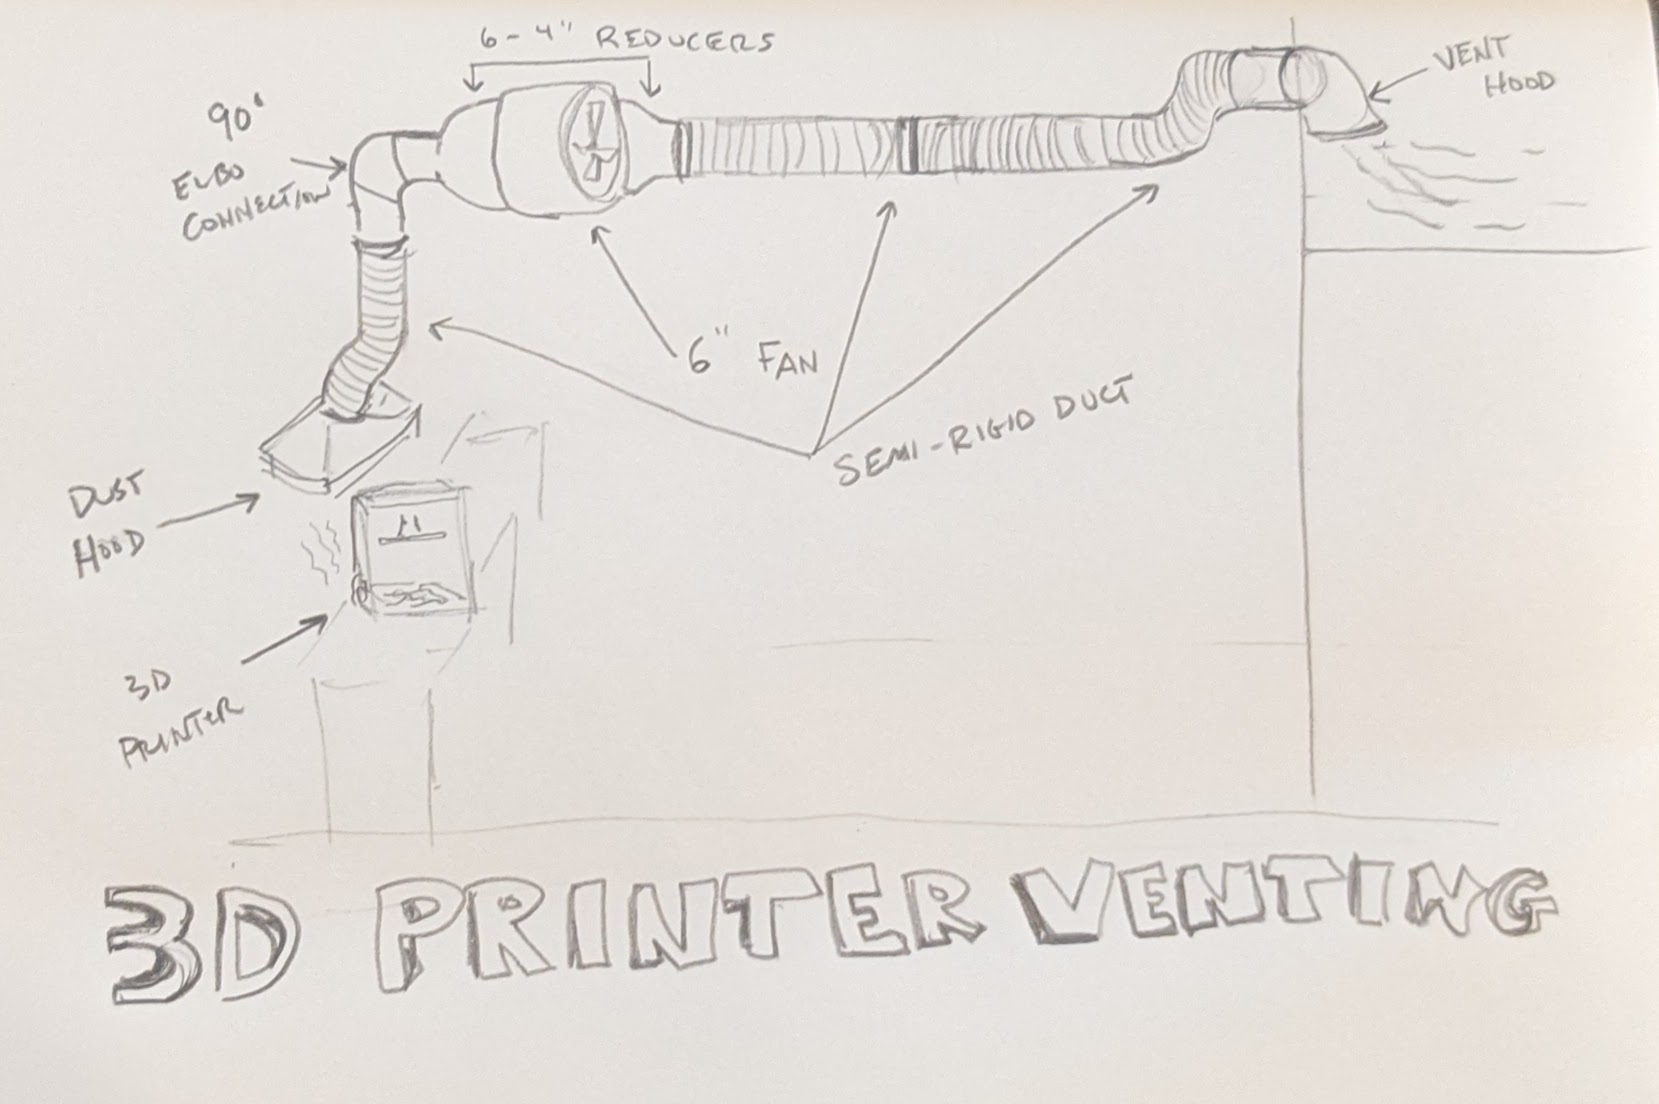
Andy and I came up with a few ideas (including just cutting a piece of wood to size, slapping it into the window well, cutting a hole in it, and popping in the fan from there. Some time elapsed (I believe it was winter), and we came back together to discuss over the spring. At that point, we were both vaccinated and able to see one another in person – we scoped out the area and came up with a plan. Andy gave me a rough idea of what to buy and I… literally did nothing. It would be the very end of summer when I finally reached out to him again and we scoped the project once more. This time, I ordered what we needed, and Andy made a Home Depot run for some additional stuff.
We came up with the supplies listed above. The plan was simple: Drill a hole through the side of the house, just above the concrete foundation; Pop on a vent hood; run the semi-rigid duct through the ceiling to the other side; mount the fan, connect it all up, and boom!
The Execution
To begin, I needed to pop open the drop ceiling and remove all the insulation. This was fun (nope, it wasn’t). I definitely did not get fiberglass all over my arms and in my mouth.
I. The Hole
Then, Andy came by and we began drilling. We first made a small pilot hole from inside, just kind of eyeballing it. Lucky for us, the hole was spot-on. We then headed outside.
Andy was kind enough to let me have all the fun. I drilled the 4″ hole from the outside – it took some time to get through all the layers, and on multiple occasions the drill jerked and I thought I had broken my wrist, but I got the job done.

From there, I ripped out the rest of the wood chunks and all the sudden I could see my glorious hobby space from the outside.
I then had to cut off some more shingles to fit the hood.

We then slapped on some silicone and put in the screws. Voila! Vent done.

I was very happy with the result, other than a few nicks in the shingles, and the fact that the “bird protector” juts out a bit from the vent hood.
II. Laying duct
After a single back and forth trip outside to resize the tube coming out of the back of the vent hood, we got back to the room. We hooked up the flexible duct to the vent tube and extended it as far as it would go across the room (about halfway). We then set this aside to figure out how to mount the darn fan.
III. Mounting the Fan
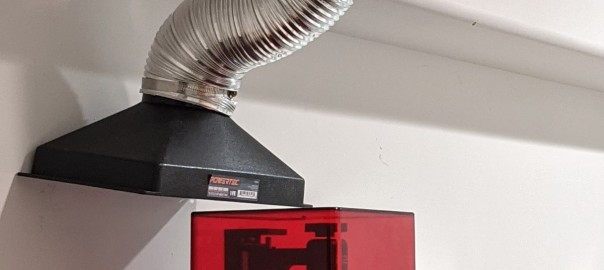
Before mounting the fan, we slapped on the 6-4″ reducers to each end with some drill screws, and, added the 90 degree pipe.

Then it was time to figure out how to mount it. This was the second real challenge. Thankfully, Andy was the brains of the operation. He sliced up a couple of 2 x 4s to fit (only needing to cut twice!) and we measured the distance between them to fit the fan.

From there, mounting the fan was easy

I checked the time and once this step was complete it had been just under three hours and we were almost done!
IV. Final Connections
At this point, we had already tested the fan to make sure it worked (I suggest doing this very early on as the first time we realized that some of the screws we had popped on to fit the reducer were bumping into the motor!) so all that was left was to make the final connections.

Once everything was connected up, we again turned on the fan to check that air was escaping from the outside. We then plugged in the speed adjustor to the wall, cut some holes in the drop ceiling, and closed everything up.
The last thing to do was to pop on the hood and get the 3d printer lined up!

And that’s about it! Feel free to ask questions in the comments. I am sure I forgot something.
For a final test we lit some paper on fire and watched the glorious smoke escape up the hood. I also couldn’t resist printing up some mini sci-fi crates I found on Thingiverse as my first smell-free, chemical-free (hopefully) print.

Happy printing!
